経路探索、せっかくなので色々と使いこなしたい。
ということで、サンプルを作ってみた。
A* Pathfinding Projectについては、こちら今回作成したデモ(パッケージ付き)
http://dl.dropbox.com/u/56297224/UnitySample/astar/astar.html
■サンプルパッケージの実行方法[Unity3D]無料で経路探索、A* Pathfinding Projectを試す。その1(terasurware)
http://terasur.blog.fc2.com/blog-entry-63.html
1.サンプルのパッケージをダウンロード
http://dl.dropbox.com/u/56297224/UnitySample/astar/a%2Asample.unitypackage
2.A* Pathfinding Projectのフリー版をダウンロード
http://www.arongranberg.com/unity/a-pathfinding/download/
3.ダウンロードした2つのファイルをインポート
4.[A_test]>[Scene]>atestのシーンを起動
■やってること
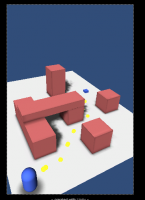
RootMakerスクリプトで、[target]に至る道にプレハブを配置しているだけ。
もうちょっと細かく話すと、
seeker.StartPath( this.transform.position, this.target.position, OnPathComplete );
これで移動ルートを取得。
OnPathCompleteはパス生成後に呼ばれるイベント的なもの。
で、パスが取得できたら
foreach( Vector3 pos in p.vectorPath )
こいつで黄色いプレハブをルートに配置する。
{
GameObject tmpNodeInstance =
GameObject.Instantiate(
this.prefub, pos,
Quaternion.identity ) as GameObject;
tmpNodeInstance.transform.parent = transform;
}
これでルートが取得できる。
AIFollowは、このルートに添って移動しているみたい。