後日、このテーマを用いた動画を作成する予定なので、その手順メモ。
作る内容は、こんな感じ。
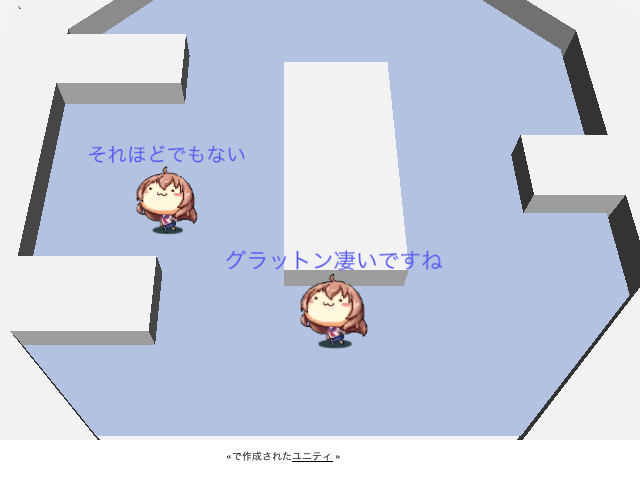
実際の動作
(ローカルのみ板)
(ネットワークプレイ対応版)
チャット機能は入れることは簡単だけど、
キャラクターの移動と利用機能がかぶるので、動画ではスルーする。
■インポート作業
Quad UIをインポート
AstarPathfindingProjectをインポート
■シーンの設定
GameSystemってフォルダを作成し、offlineって名前でシーンを保存
■ステージを作る
ブロックプレハブを生成。タグはWall
プレートを設定。タグはGround。
色を作成し、Groundに割り振る
ライトを設定する
作ったステージはStageに格納しておく。
■キャラクターを作る
Characterフォルダを作成
Charactorで使う絵をインポート
Quad UIでCharacterのモデルを作成
Characterの大きさを調整。x:0.04、y:0.04くらい。
空のGameObjectを作成し、Playerと命名。
Characterを配置。位置は0:0:0に。
表示できるように微調整
レイヤーをPlayerに変更。
簡単なビルボードを実現するためのスクリプトを作成。
名前はQuad2DLookAtCameraとでも。
using UnityEngine;
using System.Collections;
public class Quad2DLookAtCamera : MonoBehaviour
{
private Transform cameraTransform;
void Start ()
{
cameraTransform = Camera.main.transform;
}
void Update ()
{
transform.rotation = cameraTransform.rotation;
}
}
■経路探索用のカーソル(ターゲット)を設定する
Cylinderを作成。名前はcursorとでもしておく。
適当な位置に配置。
見た目が寂しいのでマテリアル作成→適応。
Animationを設定し、点滅するように設定。
(開始時Color.qが0.4、1秒で0.3、2秒で0.4)
Animationの名前は、Switch Cursor。
■キャラクターが移動可能な範囲を設定
AstarPathをStageに登録。
Grid Graphを追加。
ノードの範囲を設定。
Collision testingのMaskをWallに変更。
Height TestingのマスクからPlayerとWallを外す
SettingsのDebugのPath Log ModeをOnly Errorsに。
■カーソルに向けてキャラクターを動かす
PlayerにAllFollowを貼り付ける。
targetにcursorを設定。
rotation speedを3(speedと同じ)に設定。
■カーソルの位置を変更する
ソースコードを入力する。
作成したコードはPlayerに貼り付ける。
using UnityEngine;
using System.Collections;
public class TargetPositionUpdate : MonoBehaviour {
public LayerMask mask;
public Transform target;
protected Camera cam;
//AIFollow ai;
void Start () {
cam = Camera.main;
//ai = GetComponent
}
void Update () {
if( 2.5f > Vector3.Distance( transform.position, target.position))
{
//ai.WaitToRepath();
target.renderer.enabled = false;
}
if(Input.GetKeyDown(KeyCode.Mouse0))
{
RaycastHit hit;
if (Physics.Raycast (cam.ScreenPointToRay (Input.mousePosition), out hit, Mathf.Infinity, mask)) {
if( hit.transform.tag == "Ground")
{
UpdateCursorPosition( hit.point);
}
}
}
}
void UpdateCursorPosition(Vector3 position)
{
target.position = position;
target.renderer.enabled = true;
//ai.Repath();
}
}
■一度動かす
■サーバーを用意
Userって名前の空オブジェクトを作成し、payerとcersorを入れる。
Userをプレハブ化
Simple Serverスクリプトを作成してServerって名前のオブジェクトにでも貼り付ける。
using UnityEngine;
using System.Collections;
using gui = UnityEngine.GUI;
public class SimpleServer : MonoBehaviour {
public GameObject prefub;
public string ip = "127.0.0.1";
protected string port = "4211";
protected bool connected = false;
private void CreatePlayer()
{
connected = true;
int positionNo = Random.Range(0, transform.childCount);
Transform childTransform = transform;
Network.Instantiate(prefub, childTransform.position, childTransform.rotation, 1);
}
public void OnDisconnectedFromServer()
{
connected = false;
}
public void OnPlayerDisconnected(NetworkPlayer pl)
{
Network.DestroyPlayerObjects(pl);
}
public void OnConnectedToServer()
{
CreatePlayer();
}
public void OnServerInitialized()
{
CreatePlayer();
}
public void OnGUI()
{
if( !connected)
{
ip = gui.TextField( new Rect(30,10,90,20),ip);
port = gui.TextField( new Rect(30, 40, 90, 20), port);
if( gui.Button( new Rect( 30,70,90, 20), "Connect"))
{
Network.Connect(ip, int.Parse(port) );
}
if( gui.Button( new Rect(30, 100, 90, 20), "host"))
{
Network.InitializeServer(10, int.Parse(port), false);
}
}
}
}
Serverオブジェクトに適応
prefabにUserを指定
■プレイヤーのネットワーク対応
PlayerにNetworkViewコンポーネントを追加。
Userをプレハブ化。
ServerのprefubにUserを追加。
TargetPositionUpdateクラスのソースを一部改変
UpdateCursorPositionの呼び出しをnetworkView.RPC("UpdateCursorPosition",RPCMode.All, hit.point);に変更
void UpdateCursorPosition(Vector3 position)の前に[RPC]をつける。
newtork.isMineで自分以外のカーソルを動かさないようにする。
バックグラウンド実行を許可